| |
Tis the seasons for colds! They are now upon us. But Baby BALM! has an awesome new product that they just launched called Eucalyptus rub. It is not only a natural congestion aid that helps relieve congested coughs and stuffy noses, but also helps with nausea and morning sickness, and is safe for babies 3 months and up. This and all Baby BALM items should be in the store at the end of the week.
 | |
Don't forget your reward points! There are many mama's that have enough points for some new fluff! The easiest and FREE way to earn them is by reviewing items. They do not have to be purchased at GBG, so if you have tried something we carry, please let other mamas know what you thought of it!
Looking for fluff on a budget? Check out our Under $10 Fluff section and out On Sale section. You are sure to find a way to cloth diaper for any budget.
|

Thursday, November 1, 2012
November Newsletter for Green Baby Goods


Wednesday, September 26, 2012
Baby Carriers...which to choose???
So several months ago I decided to start looking for a carrier for my youngest. He is 17 months old and if he is not inside of the gate in our living room, he is up to no good. Which if I only wanted to hang out in the living room the entire amount of time he was awake, I would be OK with that. But cooking dinner, doing laundry, making beds, etc cannot all be done from the living room, so I decided to get a carrier. Now if you have ever been in the market for one, you would know that there are so many different types to choose from. There are buckle carriers (Boba, Beco, Ergo, etc), wraps (Moby, Boba, Gypsy Mama, etc), ring slings (Sakura, Maya, Taylor Made, etc), and the list can go on.
I used a Moby with Maddox when he was a newborn, which I loved in those late nights of him not wanting to sleep and me wanting my hands to at least be able to read and put dishes away, or whatever I needed to do to keep myself awake at 3 am, but I had tried putting him into it recently and it just really weighed me down. He is about 25 lbs and that was just too much for me.
So I began asking around about the carriers and getting recommendations. From what I could already see I was definitely wanting to get a buckle carrier. I wanted something that my husband could use too and he really liked the baby bjorn when Maddox was tiny. I knew a wrap, he wouldn't touch, and I cannot see him wearing a sling. When I started asking my cloth diaper mama's what their favorite carrier was I got so many different suggestions. What some liked, what they didn't about several different carriers. But someone had told me that there is a mama who rents out carriers on a trial basis. Yes! This is what I needed.
So I came across Amber from Heavenly Hold. You can rent almost any of the buckle carriers from her website. I decided to try 7. She would ship them to me 3 at a time. So the first three that I received were the Action Baby Carrier, the Beco Gemini, and the BabyHawk Mei Tai.
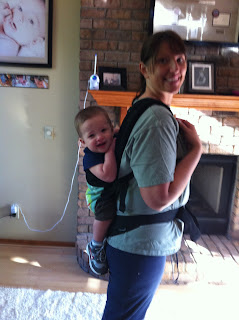
So here is the back of the Action Baby. Now I know he is crooked (although I could not see that), but he kept leaning toward the side. I am not sure if it were the carrier or something I was doing wrong, but I just didn't like the way he felt in this.

Side view. These were taken by my nine year old, so this one is a little blurry. I do like that his arms come out the top. Huge bonus when you have a toddler who wants to touch everything. Makes him feel a little less confined. This one is also much cheaper than the other buckle carriers that I tried AND this one has a hood built on, which was nice too. I also really liked the color options.

The next one I tried was the Beco Gemni. There were lots of things that I liked about this carrier. The built in headrest is great! This is nice with a toddler so that their arms can stick out the top (this will be a great bonus for most of the carriers for my sake). But another great feature with this carrier is that it can be hip worn. Prior to any kind of carrier testing, hip carry is how I have carried any child I have ever picked up, so I like having this as an option.
Here is a side view of the Gemini. Now I can tell by looking at this photo that his leg should be behind the strap, not in front of it. And his eyes are closed, but you get the idea!

Back view. I really like how he sits in this carrier. He was comfy.

The next set of the carriers I got was the Babyhawk Mei Tai, Beco Butterfly II, the Boba Classic and the Ergo Performance.
So first to try on was the Ergo Performance.

Here is the back view

Now here is the thing about the Ergo. As you can see my son's arms hang out the top, which, as you know, I love. But here is the thing, I tried this carrier on several times after this, and could not get his arms out the top, he sat too low. I have no idea how I did this. I tried and tried, each time making him more upset. Now I like that the hood is in the zipper pocket and the shoulder straps were very cushiony and soft, and he really appeared to like this carrier. BUT I could not get him this way again and he does not like his arms secured to where he can't flip off light switches and drink out of his cup, so this one is a no for us.
So next is the Beco Butterfly II. ***My Second Favorite**

I love this carrier. And for several reasons too. First I could actually move Maddox from front to back with only some effort AND could do it by myself. Also a HUGE bonus, there is a barrier in between me and Maddox so I didn't get as hot with him and I could keep him in the carrier and move him from myself to my husband. This one also comes with an infant carrier. I plan on having another baby and not having to spend an extra $30 on an infant insert is a great advantage. The Beco's also come in some cute styles.
Back view:

Side view:

So the next thing that I tested was the Boba. Now even though I liked this carrier, it just didn't come with anything extra. Head rest, infant insert, etc. So as cute as this was and I love the product, I just liked the extras that came with the Beco. But here is the back and side view.

I have to admit, I really love the kangaroo on the back of this!
So HERE is my Favorite! Now I want to start out by saying that I tried all of these buckle carriers and really fell in love with them. Then, when I took this out of the package and saw I had to TIE it on, I pushed it to the side, eh, too much work. So for a week, I strutted around all of the other carriers. Then right at the end of my trial I took out the Mei Tai Babyhawk and thought I paid for the trial, I mine as well TRY it. So I put DS on my back and strapped it on and FELL IN LOVE. Now I want to start out by saying that I had already emailed Amber and told her to go ahead and order the Beco, that I liked the features. But found myself, for the last 4 days of my trial, ONLY wearing the Babyhawk. I LOVE LOVE LOVE this carrier! I like that the straps cross in front. I think this is probably the greatest feature, it really made it easier to carry Maddox. I also like that it wraps up small and that there is no adjusting of the straps. I just put him on and tie the straps in two places. Now the pattern I got, was not cute, OK, how about not my style. So I again, emailed Amber and told her I also wanted a Babyhawk but needed a different color. So I went on their site, designed a CUSTOM carrier, with all the bells and whistles. Pattern on both sides, color coordinated straps, pocket, toy strap, I went all out! And now, I patiently wait for my super awesome Babyhawk.
So the only bad news is that I cannot find the pictures that I took of this! ::SIGH:: But once my new snazzy carrier shows up I will be taking some pics and posting them!
I used a Moby with Maddox when he was a newborn, which I loved in those late nights of him not wanting to sleep and me wanting my hands to at least be able to read and put dishes away, or whatever I needed to do to keep myself awake at 3 am, but I had tried putting him into it recently and it just really weighed me down. He is about 25 lbs and that was just too much for me.
So I began asking around about the carriers and getting recommendations. From what I could already see I was definitely wanting to get a buckle carrier. I wanted something that my husband could use too and he really liked the baby bjorn when Maddox was tiny. I knew a wrap, he wouldn't touch, and I cannot see him wearing a sling. When I started asking my cloth diaper mama's what their favorite carrier was I got so many different suggestions. What some liked, what they didn't about several different carriers. But someone had told me that there is a mama who rents out carriers on a trial basis. Yes! This is what I needed.
So I came across Amber from Heavenly Hold. You can rent almost any of the buckle carriers from her website. I decided to try 7. She would ship them to me 3 at a time. So the first three that I received were the Action Baby Carrier, the Beco Gemini, and the BabyHawk Mei Tai.
So here is the back of the Action Baby. Now I know he is crooked (although I could not see that), but he kept leaning toward the side. I am not sure if it were the carrier or something I was doing wrong, but I just didn't like the way he felt in this.

Side view. These were taken by my nine year old, so this one is a little blurry. I do like that his arms come out the top. Huge bonus when you have a toddler who wants to touch everything. Makes him feel a little less confined. This one is also much cheaper than the other buckle carriers that I tried AND this one has a hood built on, which was nice too. I also really liked the color options.

The next one I tried was the Beco Gemni. There were lots of things that I liked about this carrier. The built in headrest is great! This is nice with a toddler so that their arms can stick out the top (this will be a great bonus for most of the carriers for my sake). But another great feature with this carrier is that it can be hip worn. Prior to any kind of carrier testing, hip carry is how I have carried any child I have ever picked up, so I like having this as an option.
Here is a side view of the Gemini. Now I can tell by looking at this photo that his leg should be behind the strap, not in front of it. And his eyes are closed, but you get the idea!

Back view. I really like how he sits in this carrier. He was comfy.

The next set of the carriers I got was the Babyhawk Mei Tai, Beco Butterfly II, the Boba Classic and the Ergo Performance.
So first to try on was the Ergo Performance.

Here is the back view

So next is the Beco Butterfly II. ***My Second Favorite**

Back view:

Side view:

So the next thing that I tested was the Boba. Now even though I liked this carrier, it just didn't come with anything extra. Head rest, infant insert, etc. So as cute as this was and I love the product, I just liked the extras that came with the Beco. But here is the back and side view.


I have to admit, I really love the kangaroo on the back of this!
So HERE is my Favorite! Now I want to start out by saying that I tried all of these buckle carriers and really fell in love with them. Then, when I took this out of the package and saw I had to TIE it on, I pushed it to the side, eh, too much work. So for a week, I strutted around all of the other carriers. Then right at the end of my trial I took out the Mei Tai Babyhawk and thought I paid for the trial, I mine as well TRY it. So I put DS on my back and strapped it on and FELL IN LOVE. Now I want to start out by saying that I had already emailed Amber and told her to go ahead and order the Beco, that I liked the features. But found myself, for the last 4 days of my trial, ONLY wearing the Babyhawk. I LOVE LOVE LOVE this carrier! I like that the straps cross in front. I think this is probably the greatest feature, it really made it easier to carry Maddox. I also like that it wraps up small and that there is no adjusting of the straps. I just put him on and tie the straps in two places. Now the pattern I got, was not cute, OK, how about not my style. So I again, emailed Amber and told her I also wanted a Babyhawk but needed a different color. So I went on their site, designed a CUSTOM carrier, with all the bells and whistles. Pattern on both sides, color coordinated straps, pocket, toy strap, I went all out! And now, I patiently wait for my super awesome Babyhawk.
So the only bad news is that I cannot find the pictures that I took of this! ::SIGH:: But once my new snazzy carrier shows up I will be taking some pics and posting them!
Wednesday, September 19, 2012
How To Make Wool Dryer Balls from Yarn
So you are looking for a new way to save some money AND the environment? Wool dryer balls help your laundry in many ways. They are a natural fabric softener (since you cannot use fabric softener on your cloth diapers, this is a great alternative), they reduce the static in your clothes AND they break up the clothes while in your dryer so that they dry faster. There are 2 different ways to make dryer balls. Wool batting, and wool yarn. This tutorial is with yarn, since it is the simplest and easiest to get the supplies for. I am going to walk you through step by step on how to make your own dryer balls, with some simple steps and some time (and maybe a little hand numbness) but hey! I promise, it is worth it in the end. Now I will tell you that for these to be the most effective, you will need several. And by several I would say 6-8. Each one will help a little more, so if you are only starting out with 2, it will still help SOME just not as much as, say, 8 would. So start with some wool yarn. You can buy this at just about any place that sell yard (although I did not see it at Walmart). Now you are looking for a specific kind of wool. It should say "good for felting." If it is washable, it is no good for this project. Here is what I will be using today: 


Now start by winding the wool around your fingers, and then pull off and wind around itself. 


And then here comes the time. Winding takes about an hour. Just keep going in circles. I keep flipping the ball every 3 times I wrap. The process is long, but it is the longest part and most difficult in the project. BUT with that being said, the most rewarding since you can see your ball coming together!

Wind this until you have used half of your yarn (4 oz). It barely fits in my palm (to give you a better perspective).

If you do not have a scale, this is what it will look like in a visual, with half used in the first ball.

What I do is tie the loose end to another piece of the yarn. If you have a felting needle, you can also use this to push down the end, but this works good for me, and also helps in it not coming unraveled.

And then comes the washing part. Put your ball into a nylon stocking. I buy knee highs which fit three balls. You can get these anywhere (dollar store). I put the seam on the outside like so:

And then stuff the nylon into a pillow case and tie the pillowcase shut.

I then wash the pillowcase with anything else that I can on HOT water. I do this three times to really get the ball felting. Once you are done, take the nylon ball out of the case and take the nylon off the ball. It may take some work as some of the wool fibers will make their way out of the nylon. Go slow so that part of the nylon will not stay stuck to the ball. At this point I usually scent my ball with a few drops of essential oil, but it is not necessary. Here is what my dryer looks like. I like having many balls. The more you have the less static and the more they will bounce around and help break up the clothes.

Several of mine are made from wool batting (which is in another post). Please feel free to post questions or comments! I love to hear how wool balls work in your dryer!
Wednesday, September 12, 2012
How To Make Wool Dryer Balls from Wool Batting
OK last week I brought you the simple quick, and easy to get products to make the wool dryer balls from wool yarn. This week I am bringing a tutorial on how to make them from wool batting. Most of the shops that you see online either use wool batting or wool roving. I actually use both! Now I find batting, really by googling it. Last time I wanted organic batting, which was a little more of a challenge, so I was able to find it on Etsy. The shop that I purchased my wool from is Bungalow Bear, but I am sure there are many out there if she is out of stock.

So here is a visual of the wool spread out on my living room floor. 2 lbs is a lot! So I spread this out in a big area where I have a lot of space as it is about 10 feet long and 2 feet wide. You then start at the top and pull a very thin layer from one end to the other. Thinner is better. It is easier when you start winding it.

You will then take the wool and start winding it around itself, making a ball. Wind the wool as tight as possible, making the ball more dense. Yes, this will cramp your hand after some time, but a lightweight ball will put a bunch of wrinkles all over the ball, which makes in work, but not as pretty, and who wants ugly balls??
Now, optional, but in my opinion necessary, get a felting needle (eBay for a couple of bucks shipped) and as you go punch this needle into the ball multiple times. I do this every time I grab another piece of wool. It does make the process take more time, but it holds the ball together and if you need to set it down, you can.


Here is what felting the ball looks like. Really, it is just poking it. The felting needle is a regular needle, but it has these grooves in it that grabs pieces of the wool and pushes them down into the ball.
Just keep doing this until your ball is big. And by big I mean bigger than a softball. I have seen dryer balls that are the size of golf balls up to the size of softballs. The size in completely up to you. I like mine to be bigger because they are less likely to get stuck inside of clothes (shirt sleeves, pajama pants, etc). Keeping in mind that when you start the washing part, the ball will shrink.
So after your ball is done being wound into a ball, you will then put it into a nylon stocking. I have seen people tie the knot right to the ball, I make it a little loose so that it doesn't put a mark on the ball. Remember to put the seam of the nylon on the outside, in other words, flip the nylon inside out, and then put your ball in. You are doing this so that the line on the nylon doesn't get put on the outside of your beautiful ball!

Then put your ball into a pillow case, and tie the pillow case with a knot. And throw your ball into a wash on HOT water. I use Eco's Detergent, but really any eco-friendly detergent will work. I wash each ball three times on hot water. Then remove the ball from the wash and the pillow case.
You will see the fibers of the wool coming through you nylon. The nylon may take some time and work to get off of your ball since the fibers have started making their way out. This is a GOOD sign, your ball felted right!
Here is my ball:

Now the ball will be misshaped and the wool, in my opinion, doesn't smell too good. So you shape it back into place, nice and round and throw it in the dryer on high. This will dry to the round shape and help get the wool smell out. Time will really help with that too. When you have dried it your ball should look something like this:

Now before you dry it you can add wool roving in just about any color. I felt mine on and then wash on hot 2 more times. I also then add the scent and throw those into the dryer.
Wednesday, September 5, 2012
So let's talk about MAMA CLOTH
So I wasn't exactly sure on how to go about this. But I wanted to talk about that wonderful thing that most of us dread every month. Call it what you will (period, cycle, BFF, Aunt Flo), for the purposes of this article, and any that I discuss, I call it AF (Aunt Flo). I think I was in a group of TTC (trying to conceive) when I first heard this term. It has since grown on me. So I wanted to discuss some green ways to get through this week (or days for some of you lucky gals).
I am sure that most of the population use one of two forms to "collect" AF.These are what I was using prior to mama cloth. The first one I started with was pads, ya know the always, kotex, etc, kind. You can buy these at your local grocery store. These worked great until high school and then I switched over to tampons (I always preferred Tampax, but whichever). This was what I used, and most of us have only ever heard of!
Then about 18 months ago I started using cloth diapers. I fell in love with these. I joined a few chat groups and at some point saw someone talking about mama cloth....say what?
Ahhh...mama cloth. Yes, I was certainly skeptical about these. I mean where do you put them after you have used them? How do you wash them? What if you work, you have to carry these around? Yes, these were all my questions. I mean, I didn't want to carry a gross pad in my purse all day at work, right?
So I am going to break it down for you. First mama pads are wonderful. I mainly only use them at night and for liners, and right in the beginning of AF since it is heaviest then. I also use a menstrual cup (which I will discuss next week). These are also great for those first 6 weeks home with your baby, when you cannot use a cup or tampon.
So this is what a mama cloth looks like:
 Is it not gorgeous? This one is a postpartum mama cloth, otherwise I would have been showing this from my stash. This is made with bamboo velour. And for a lot of these, they do not stain (mine topped with this I have had over a year with no stains!). This one is made by The Pink Lemonade Shop (I just purchased some from her today). And I am super excited to get them! Green Baby Goods carries Lunapads, which come in all sizes and flows, a great way to start out. All of the ones that I own have fleece on the back to help in them shifting. Some brands work better than others for this, and some even use PUL.
You can go about this in a few different ways. I have a small Planetwise bag that I use when I go into work, a ziploc bag will also work. I do not carry this with me to the bathroom, I just wrap it up into itself (see below) and carry it back to my desk to put into my bag. Most of the pads that I have bought have snaps that snap around your underwear, then you flip them to snap shut.

I am sure that most of the population use one of two forms to "collect" AF.These are what I was using prior to mama cloth. The first one I started with was pads, ya know the always, kotex, etc, kind. You can buy these at your local grocery store. These worked great until high school and then I switched over to tampons (I always preferred Tampax, but whichever). This was what I used, and most of us have only ever heard of!
Then about 18 months ago I started using cloth diapers. I fell in love with these. I joined a few chat groups and at some point saw someone talking about mama cloth....say what?
Ahhh...mama cloth. Yes, I was certainly skeptical about these. I mean where do you put them after you have used them? How do you wash them? What if you work, you have to carry these around? Yes, these were all my questions. I mean, I didn't want to carry a gross pad in my purse all day at work, right?
So I am going to break it down for you. First mama pads are wonderful. I mainly only use them at night and for liners, and right in the beginning of AF since it is heaviest then. I also use a menstrual cup (which I will discuss next week). These are also great for those first 6 weeks home with your baby, when you cannot use a cup or tampon.
So this is what a mama cloth looks like:
You can go about this in a few different ways. I have a small Planetwise bag that I use when I go into work, a ziploc bag will also work. I do not carry this with me to the bathroom, I just wrap it up into itself (see below) and carry it back to my desk to put into my bag. Most of the pads that I have bought have snaps that snap around your underwear, then you flip them to snap shut.

The top snap I use to snap onto my underwear, the one furthest out I snap when I wrap it up.
Like so:

So they really are pretty descrete, and when they are wrapped up like this, you can fit several in a quart sized freezer bag.
Now for home, I use at old wipes container and just throw them in there when they are used, and then I store them all in the same tub when they are cleaned and not being used for the other 3 weeks of the month. It was free and I found a way to re-purpose it. A wetbag and ziploc bag would work in the same way.
So far all of the mama cloth I have purchased come with instructions on how to wash. To be honest, I just throw mine in with my cloth diapers, which is virtually the same instructions. But I am not going out of my way to wash them. I throw them in a quick wash right with my cloth diapers to rinse them in cold and I wash on hot with vinegar and eco friendly non scented Eco's. I do not have a line in my yard (yet!), but I stick mine on top of my dryer or dry on extra low (a setting my new dryer has), and they still look like new.
I am a fan of mama cloth and I promote it to everyone. I hope that this helps in your quest to learn more.
Thursday, June 21, 2012
Summer Cloth Diaper Hop


I have decided to go on a mission to try just about every cloth diaper out there. And not for any other reason but I love the experience. Seeing that my mail has come. opening the mailbox to see a package that I know is fluff, getting to prep my new fluff and then out using it, and doing extra laundry, just so I can get it back on the baby. Yes, new fluff is wonderful!


So as most of you know I run the store Green Baby Goods and put out a question of what my fan's favorite diapers were and one of them had mentioned Groovycheeks. Now until that day I had never heard of them, and I have heard of a lot, so I started looking into them. Groovycheeks offers 2 different types of diapers, both are pockets, but one is has a microfiber insert with a microfleece inner, and the other is their bamboo diaper with 100% bamboo fleece inner. So I contacted them about carrying them in my store, and got in a stock of their bamboo diapers. They asked if I would like to have one to review, and I said ABSOLUTELY! So, in came my fluffy mail!
Here is what sets this diaper apart from the others. The first thing is the inside of the diaper. It is charcoal in color. So, when baby poo's, there is no staining (why aren't more companies doing this?!?!). The second is how trim the insert is and that it is made up of 70% bamboo 30% cotton.


The outside is made of a very soft material, not PUL, as the PUL is hidden, so it feels more like a pair of shorts, rather than I diaper which was also very appealing!


I added a few in motion shots so that you can really see how trim this diaper really is!
Pros:
No stains will show
All natural insert
Natural fibers touch baby
TRIM!
One sized
Cons:
Only comes with one insert. I have a SUPER heavy wetter since he drinks non-stop, so he only lasted about an hour in it
Buy Groovycheeks HERE
Would you like to win a Groovycheeks Bamboo Cloth Diaper AND a $10 gift card to Green Baby Goods? Fill out the form below!!
a Rafflecopter giveaway
Have you tried THIS planner?
Recently I was given the opportunity to review a planner by a company called dotmine, who uses those right? But it isn't really like the trapper keeper style, it more less is simple like a notebook. I have seen moms that carry around a notebook trying to keep track of parties, soccer games, dance lesson, etc, and really it's the same kind of thing, just much more organized.

It really looks more like a notebook!
 So here is how we decided to do it. If one of us knows of something that is coming up, dinner with a boss from work, sleep over at a friends, soccer game, you name it, each member writes it in the book. My nine year old doesn't yet have a cell phone (and as far as I am concerned won't until he can pay for it himself), but hubby and I do. So all of the events that we have planned out, for as long out as we know go into the planner, and then hubby and I can add each others to the calender on our phone. This way there is communication between us, and our oldest too.
It also comes with these cute stickers to make something stand out, such as a holiday, dentist appointment, and even stickers to remind you of your self breast exam (promoting women's health is awesome!).


This planner retails for $18.99 and includes:
- 17 months: school & calendar
- Monthly, weekly and seasonal views
- Inside back pocket
- Tear out margins
- Weekly quotes
- Stickers for events
It really is a great and easy way to keep the family "in the know" and able to plan accordingly. There is no longer a reason to have an excuse on whether or not they were told about something, as long as you can remember to write it down!
Please show dotmine some love!

Karma Media has teamed up with Dot.Mine Planners to give 20 readers a planner each. Winners will be given a choice as to which planner they would like from Dot.Mine, day planners that help you find your scheduling bliss!
Giveaway is open to US residents only and will end July 6, 2012 at 11:59 PM EST
Enter the Rafflecopter below and GOOD LUCK!!!
a Rafflecopter giveaway
Subscribe to:
Posts (Atom)